[ad name=”ad-articlebodysq”]Here’s a quick tutorial on how to configure SNMP v3 for the ERS8600,ERS1600, and ERS5500. In this day and age it is becoming more and more paramount to secure the network infrastructure and SNMP v3 is just another evolution in that process. The commands documented below are fairly straight forward and while the syntax might differ between the different switch models the basic principles are the same.
Here are the values I’m going to be using below;
SNMP v1,v2 read-only string = readme123
SNMP v1,v2 read-write string = writeme123
SNMP v3 userID = Manager (yes I use the same username as the old BayRS software)
SNMP v3 SHA authentication = winnie2009
SNMP v3 AES encryption = poobear2009
Nortel Ethernet Routing Switch 8600
One word of caution with the ERS8600; early default switch configurations included a SNMPv3 user called initial that had full read-write access to the entire switch. I’m not sure if Nortel has changed this behavior but I would strongly urge you to delete any default SNMP v3 users as well as change the default SNMP community strings.
Let’s set the SNMP community strings right away;
 ERS-8610:5# config snmp-v3 community commname first new-commname readme123
 ERS-8610:5# config snmp-v3 community commname second new-commname writeme123
Let’s load the proper AES, 3DES and DES encryption files;
 ERS-8610:5# config load-encryption-module 3DES /flash/p80c5110.img
 ERS-8610:5# config load-encryption-module AES /flash/p80c5110.aes
Let’s create a new SNMP v3 user called Manager;
config snmp-v3 usm create Manager sha auth winnie priv-prot aes priv poo
Let’s create a new SNMP v3 group called admin;
config snmp-v3 group-access create admin "" usm authPriv
Let’s give this new group access to the root MIB;
config snmp-v3 group-access view admin "" usm authPriv read root write root notify root
Let’s add the user Manager to the group admin;
config snmp-v3 group-member create Manager usm admin
Let’s clear out any previous SNMP trap hosts;
 config snmp-v3 target-addr delete TAddr1
 config snmp-v3 target-addr delete TAddr2
Let’s configure two new SNMP trap hosts. I actually have two configured on all my switches, with one being our HP OpenView Network Node Manager server (10.1.31.1) and the second being our Nortel Enterprise Network Management System server (10.1.31.2);
 config snmp-v3 target-addr create HPOpenView 10.1.31.1:162 TparamV1 taglist trapTag
 config snmp-v3 target-addr create NortelENMS 10.1.31.2:162 TparamV1 taglist trapTag
Let’s delete that default SNMP v3 user just in case it still exists;
config snmp-v3 usm delete initial
Let’s set the source IP address used to communicate with the SNMP trap hosts. I want this to be the CLIP (Circuitless IP Interface) that I use for all management purposes which in this example is 10.1.50.1. I should mention that the commands below may not appear in switch software earlier than 4.7.1 or 4.6.3.
 config sys set snmp sender-ip 10.1.31.1 10.1.50.1
 config sys set snmp sender-ip 10.1.31.2 10.1.50.1
 config sys set snmp force-trap-sender true
 config sys set snmp force-iphdr-sender true
That should be everything for the Ethernet Routing Switch 8600.
Nortel Ethernet Routing Switch 1600
I’m not going to go into the line by line detail here as I did above. You should be able to follow the explanation provided above.
 ERS-1648T:1# config load-module DES /flash/p16c2160.des

 ERS-1648T:1# config snmp-v3 community commname first new-commname readme123
 ERS-1648T:1# config snmp-v3 community commname second new-commname writeme123

 ERS-1648T:1# config snmp-v3 usm create Manager sha auth winnie2009 priv poobear2009
 ERS-1648T:1# config snmp-v3 group-access create admin "" usm authPriv
 ERS-1648T:1# config snmp-v3 group-access view admin "" usm authPriv read root write root notify root
 ERS-1648T:1# config snmp-v3 group-member create Manager usm admin
 ERS-1648T:1# config snmp-v3 target-addr create HPOpenView 10.1.31.1:162 TparamV1 taglist trapTag
 ERS-1648T:1# config snmp-v3 target-addr create NortelNMS 10.1.31.2:162 TparamV1 taglist trapTag

 ERS-1648T:1# config snmp-v3 usm delete initial
That’s the ERS1600 series switch.
Nortel Ethernet Routing Switch 4500, 5500, 5600 Series
We need to create a new view so we’ll use the name snmpView;
5520-48T-PWR(config)# snmp-server view snmpView +1.3
If you have the secure image loaded then you have access to SHA authentication, DES, 3DES and AES encryption.
5520-48T-PWR(config)# snmp-server user Manager sha winnie2009 aes poobear2009 read-view snmpView write-view snmpView notify-view snmpView
If you receive an error using the command above (see below) you may not have the secure software image loaded on the switch. If you want to use SHA authentication, DES, 3DES or AES encryption you’ll need to load the secure image. Example SW:v6.1.0.006 will only allow you to use the md5 authentication with no encryption while SW:v6.1.0.007 will allow both MD5 and SHA authentication along with DES, 3DES or AES encryption.
 5520-48T-PWR(config)#snmp-server user Manager sha winnie2009 aes poobear2009 read-view snmpView write-view snmpView notify-view snmpView
snmp-server user Manager sha winnie2009 aes poobear2009 read-view snmpView writ
                         ^
% Invalid input detected at '^' marker.
You can use the following command to just use MD5 authentication with no encyrption;
5520-48T-PWR(config)#snmp-server user Manager md5 winnie2009 read-view snmpView write-view snmpView notify-view snmpView
Java Device Manager
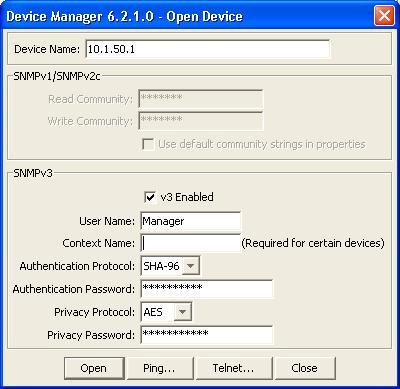
With all that done you can now use Nortel’s Java Device Manager to manage the switch using SNMP v3.
In the example to the left I’m going to connect to the ERS8600 switch at the management IP address of 10.1.50.1.
We are going to use the SNMP v3 user of Manager which we configured above.
We will also use the Authentication Protocol of SHA-96 using the Authentication Password of winnie2009 which we configured above.
We will use the Privacy Protocol of AES which we configured above along with the Privacy Password of poobear2009.
Cheers
[ad name=”ad-articlefooter”]
