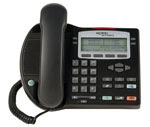
[ad name=”ad-articlebodysq”]We generally deploy just two phone models, the Nortel i2002 and the Nortel i2004. The phones support the exact same feature set, the only difference being the size of the display and the number of “keys” or appearances. The Nortel i2002 supports the following features;
Here’s a picture of the Nortel i2002 Internet Telephone.
- 4×24 Character LCD
- Headset Jack
- Handsfree speaker phone
- 802.3af PoE (Class 2)
- Internal Switch (10/100Mbps)
- XAS (Application Gateway) support
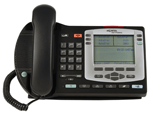
Here’s a picture of the Nortel i2004 Internet Telephone.
- 8×24 Character LCD
- Headset Jack
- Handsfree speaker phone
- 802.3af PoE (Class 2)
- Internal Switch (10/100Mbps)
- XAS (Application Gateway) support
You can see that both phones are fairly similar and they run the same software/firmware. We use a single CAT5e/CAT6 cable drop to connect the phone and then connect the end-user’s desktop/laptop to the PC port on the phone. We employ QoS to guarantee that the voice VLAN gets the appropriate priority and queuing over the data VLAN.
How do you get started?
I will outline how we configure the i2002/i2004 phones for LLDP (Link Layer Discovery Protocol / 802.1ab) and LLDP-MED for the voice VLAN assignment. We configure every phone with the same configuration throughout the enterprise. We rely on LLDP and DHCP to provision the phones with site specific information such as voice VLAN, IP address, Succession Call Server, etc.
You can of course statically configure all that information into the phone manually but then you’d need to visit the phone anytime you needed to make a change and if you had to replace a phone you’d need to re-program it to match the original settings (assuming you had them documented somewhere).
As of August 3, 2007 the phones are shipping with firmware 0604D31. This firmware does NOT support LLDP and will not have an option to enable LLDP. In order to properly deploy LLDP on the Nortel i2002/i2004 Internet telephones you’ll need to be running firmware 0604DBG or later. In order to upgrade the phone you’ll need to get it to connect to the Call Server (that means you’ll probably need to static the configuration through the phone). Once the phone connects to the Call Server it will automatically pull down the latest firmware that has been installed on the Call Server.
If you don’t have a PoE (Power over Ethernet) switch you’ll need to use a power supply to power the phone. As the phone is booting you’ll need to strike the four soft buttons at the bottom of the display window while the text “Nortel Networks” is being displayed. This will allow you to confirm that the phone is configured properly from the factory.
You should configure the i2002/i2004 IP phone as follows; (depending on what version of firmware is installed on the phone you might not see all the options below)
- EAP Enable? [1=Y, 0=N]: 0 (Default – no EAP authentication)
- LLDP Enable? [1=Y, 0=N]: 1 (we are going to need LLDP)
- DHCP? [0-No, 1-Yes]: 1 (we are going to need DHCP)
- DHCP: 0-Full, 1-Partial: 0 (we want to get a full DHCP response)
- Speed[0-A,1-10,2-100]: 0 (Auto negotiation)
- Cfg XAS? [0-No, 1-Yes]: 0 (Default – we don’t use XAS)
- Voice 802.1Q[0-N,1-Y]: 1 (Default – mark voice VLAN pakcets with 802.1Q tags)
- Voice VLAN? [0-N, 1-Y]: 1 (we want a Voice VLAN since we’ll be attaching a PC to the PC port)
- VLAN Cfg? 0- Auto, 1-Man: 0 (Automatically configure the Voice VLAN)
- LLCP MED? 0-No, 1-Yes: 1 (Voice VLAN will be configured using LLDP-MED)
- LANFILTER? [0-No, 1-Yes]: 1 (filter Voice VLAN packets from the PC port)
- Ctrl pBits[0-7,8-Au]: 8
- Media pBits[0-7,8-Au]: 8
- PC Port? [0-OFF, 1-ON]: 1 (Default – leave PC port enabled)
- Speed[0-A,1-10,2-100]: 0 (Default – leave Autonegotiation enabled on PC port)
- Data 802.1Q[0-N,1-Y]:1 (Default – mark data VLAN packets with 802.1Q tags)
- DATA VLAN? [0-N, 1-Y]: 0 (Default – we’re going to use the PVID on the switch port)
- Data pBits[0-7,8-Au]:8
- PCUntagAll? 0-No, 1-Yes: 0
- DUPLEX [0-AUTO, 1-FULL]: 0
- GARP Ignore? [0-No, 1-Yes]: 0
- PSK SRTP? [0-No, 1-Yes]: 0 (Default – you can encrypt the RTP stream if necessary)
If everything has been setup and configured properly (including the Call Server, network switch, DHCP server, etc) the phone will boot and will prompt you for a “Node Number” and “TN”.
I’ve jumped the gun by telling you how to configure the phone before configuring all the back-end equipment, including the Nortel Ethernet Routing Switch 5520 PwR and the DHCP server. In my next installment I’ll cover how to configure the Nortel Ethernet Routing Switch 5520 PwR and what you’ll need to configure in your DHCP server.
Troubleshooting
If the phone hangs with “Starting DHCP…” on the display for more than 60 seconds you’ll need to start troubleshooting. You’ll need to confirm that the phone is configured properly and you’ll need to confirm that it’s grabbing the proper IP address from the DHCP server. Just remember that the MAC address can be found on the back of the phone.
Cheers!
