 I was recently asked how difficult it was to stack a pair of Avaya Ethernet Routing Switch 4500 Series switches. I responded that it wasn’t hard at all and so began my downfall. While it isn’t very hard (honestly it isn’t) there are a few gotchas that you need to look out for and I ran into everyone of them as minutes turned into hours and for whatever reason I just couldn’t get my mojo going.
In the hopes of avoiding the same pitfalls again in the future I’m going to document the gotchas so that I might remember to read this post and plan accordingly in the future. I’m always happy to share so I hope this can help others out there so that their 30 minute change doesn’t end up taking all night long.
This first tip will apply regardless of the number of switches you already have running, be it 1 or 7. The remaining items will only really have a bearing if you are making a standalone switch a stack for the first time.
- The software and firmware code must match before you do anything. You should either upgrade or downgrade the switch(s) such that the software (agent) and firmware (boot or diagnostics) code is identical on all the switches you are going to stack together. Performing this task prior to stacking the switches will save you a lot of time and headaches. You can temporarily connect the new switch to your network with a temporary IP address and either upgrade or downgrade it as necessary. When you are finished make sure to factory reset the switch before trying to connect it to an existing switch or stack.
- Make sure that only 1 switch has the base selector set near the cascade/stack ports. The top switch in the physical stack will traditionally be set to base but you should verify that the selector below the cascade/stack ports is set to base on what I’ll call the “master” switch.
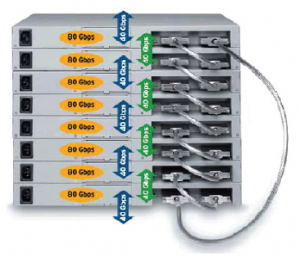
- Performing the actual stacking is pretty straight forward. If there is a stack already in place just break the stack (usually at the bottom) and connect the new switch to the last switch in the stack and to the top most switch in the stack. You need to be careful of the stack cable lengths, the default provided cable is 1.5m but you can order cables up to 5m in length if necessary. If this is a new stack you’ll need to retrieve the stacking cable that came with the original switch (I’m sure you still have it somewhere right?) and you’ll need to use both cables to complete the stacking ring. You can find some additional information and notes in this post regarding the physical changes.
- Stack IP Address / Switch IP Address. If you are making a standalone switch a stack for the first time you’ll notice that the switch will stop pinging once it successfully stacks. You’ll need to use the serial console interface to change the switch IP address and stack IP address. You need to essentially move the switch IP address to the stack IP address field. You can blank out (0.0.0.0) the switch IP address. If the switch had the IP address of 1.1.1.1 here are the commands I would use to move that IP address to the stack interface;
4548GT-PWR(config)#switch ip address 0.0.0.0
4548GT-PWR(config)#stack ip address 1.1.1.1
- Username / Password. When you stack a pair of switches for the first time you’ll notice that the username and password reverts to the factory default settings. If you haven’t changed the stack username it defaults to “RW” with no password. If you having configured a special username or password you need to reconfigure that once the switches are stacked.
4548GT-PWR(config)#cli password ?
read-only   Modify read-only password
read-write  Modify read-write password
serial      Enable/disable serial port password.
stack       Modify stack passwords.
switch      Modify switch (stand-alone) passwords.
telnet      Enable/disable telnet and web password.
Those are a few of the gotchas that can turn a quick and relatively easy change into a fiasco.
Cheers!

